Rolling into a fresh start—painting like a pro starts with the right technique
Thinking about painting a room in your house but feeling a little overwhelmed? You’re not alone. Painting your home interior might seem easy at first, just grab a roller and go, right? But anyone who’s ever ended up with streaky walls, paint drips, or weird patchy spots knows: it takes more than just a brush and good intentions to get that clean, polished, pro-level finish.
Good news? You can absolutely do it yourself, with the right steps, tools, and a bit of patience. Whether you’re freshening up a bedroom, tackling the living room, or rethinking your entire color palette, this guide will walk you through how to paint your home interior like a pro, without overcomplicating it.
Let’s break it down.
What should I do before I start painting my walls?
Before you even crack open a paint can, you’ve got to plan and prep. This part might feel boring, but it’s key to a good outcome.
Pick your paint color (and think it through)
Color has a major impact on how a room feels. Want something calming? Try cooler tones like soft blues or grays. Need energy? Warm shades like coral, mustard, or even a bold accent wall can do the trick. Take lighting into account too. Natural sunlight shows color differently from artificial lighting, so test your samples in different parts of the day.
Choose the right type of paint finish
Different rooms call for different finishes. For example:
- Flat or matte: Great for ceilings and low-traffic areas.
- Eggshell: Soft, with a slight sheen, perfect for living rooms and bedrooms.
- Satin: Durable with a bit more gloss, ideal for kitchens and bathrooms.
- Semi-gloss or gloss: Super easy to clean, best for trim, doors, and high-moisture spots.
Gather your supplies
You’ll need more than just paint. Grab:
- Painter’s tape
- Drop cloths or plastic sheeting
- Angled brush for edges
- Rollers and roller covers
- Paint tray
- Ladder (if your ceilings are high)
- Sandpaper or spackling tools (more on that soon)
Pro tip? Quality tools = smoother application and less frustration.
Prep your space
Move furniture out of the way or to the center of the room. Cover everything, floors, fixtures, furniture, with drop cloths. Remove light switch covers and outlet plates. Clean your walls with a damp sponge or mild cleaner to get rid of dust and grease (paint sticks best to clean surfaces).
Why is wall prep important before painting?
Because even the most expensive paint can’t hide a bumpy, damaged wall. Professional painters spend more time prepping than actually painting, and it shows.
Fix any imperfections
Look for nail holes, cracks, or dents. Fill them with spackle or patching compound, let it dry, then sand it smooth. For textured walls, use a damp sponge or sanding block to even out rough patches.
Clean walls thoroughly
Dust, cobwebs, or oil from hands can keep paint from sticking properly. Don’t skip this step, even if your walls look clean.
Use painter’s tape (and don’t rush it)
Apply painter’s tape around trim, baseboards, and ceilings to get crisp, clean edges. Press it down firmly so the paint doesn’t bleed underneath. And yes, you’ll thank yourself later.
Do I really need primer before painting?
If you’re painting over dark walls, fresh drywall, or stains, yes, you absolutely need primer. It helps paint adhere better, blocks discoloration, and evens out the finish.
If your walls are light-colored, clean, and you’re not making a drastic color change, you might be able to skip it or use a paint-and-primer-in-one product. But for the best results? Prime it.
How to apply primer the right way
Use a brush to cut in at corners and edges, then a roller for larger areas. Let it dry completely, usually about 1–2 hours, before applying paint.
What’s the best way to paint walls without streaks?
Let’s get to the good part: actually painting.
Start by cutting in the edges
“Cutting in” means painting the edges and corners with a brush before using the roller. Do this slowly and carefully; it’s where people often mess up. Go around the ceiling line, baseboards, and corners.
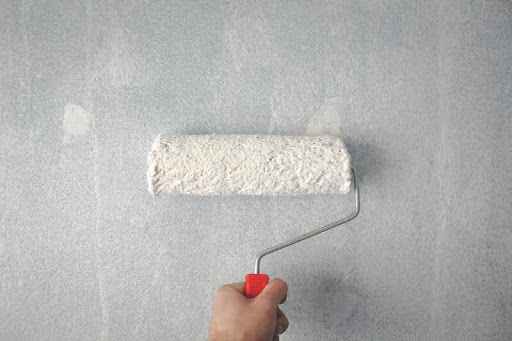
Use a roller with a consistent technique
Dip your roller in the paint tray, roll off excess, and apply to the wall in a “W” or “M” pattern. This spreads the paint evenly. Then fill in the gaps with smooth, overlapping strokes. Don’t press too hard; it can leave roller marks.
Apply more than one coat
One coat usually isn’t enough, especially with lighter shades. Two coats give you full coverage and a richer, more durable finish. Make sure the first coat is completely dry before applying the second.
How long should the paint dry before touching or recoating?
It depends on the paint type, but most latex paints need at least 2–4 hours before they’re dry to the touch, and 6–8 hours before recoating. For oil-based paints, it’s longer.
Keep windows open if possible, or use fans for ventilation. High humidity can slow drying time.
How do I clean up after painting?
Almost there, don’t ruin your hard work with a rushed cleanup.
Remove painter’s tape at the right time
Wait until the paint is dry to the touch, but not fully cured (about 1–2 hours after finishing), to remove tape. Pull it off slowly at a 45-degree angle.
Clean your tools
Rinse brushes and rollers in warm, soapy water (for latex paint) or use mineral spirits (for oil-based paint). Store leftover paint in a cool, dry spot, and label it with the room and date for future touch-ups.
How do I fix mistakes or touch up after painting?
Even pros make small mistakes. If you notice drips or uneven spots:
- Let it dry completely
- Lightly sand the area
- Repaint with a small brush
Keep a small container of the leftover paint for these fixes; you’ll be glad you did.
How do I know if my paint job looks professional?
Here’s a quick mental checklist:
- Smooth finish with no roller marks or streaks
- Clean lines at edges and corners
- No drips, smudges, or uneven coverage
- Even color across the entire wall
If you check all those boxes, congrats! You just painted like a pro.
Final Thoughts: Painting Isn’t Hard, When You Do It Right
Painting your home interior doesn’t have to be stressful. With the right prep, tools, and techniques, you can absolutely pull off a clean, polished, professional-looking result, even if you’ve never held a roller before.
So take your time. Don’t rush the prep. And remember: the finish line is so worth the effort.
Got a painting project coming up? Save or bookmark this guide so you can refer back as you go. And if you’ve got a tip that’s worked wonders for you, drop it in the comments, we’d love to hear it.
FAQs: How to Paint Your Home Interior Like a Pro
What’s the best paint finish for bedrooms?
Eggshell or satin are great options. They’re smooth, offer a slight sheen, and are easy to clean without being too shiny.
Can I paint over a dark wall without primer?
Not recommended. Dark colors often bleed through. Use a primer first to block the old color and ensure smooth coverage.
How long should I wait between coats of paint?
Wait at least 4–6 hours between coats for latex paint, and longer for oil-based options. Always check the paint can for exact drying times.
Should I use a brush or a roller to paint walls?
Use a brush for edges and corners, and a roller for large wall areas. Rollers give smoother, faster coverage.
Do I need to sand my walls before painting?
Only if there are rough patches, previous glossy paint, or areas you patched. Light sanding helps paint stick better.